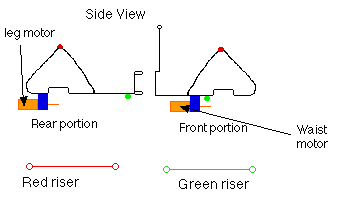
This is my cheap walker. I didn't have access to a digital camera today, so here are some Gifs of how it all fits together. The side view shows the frame in black. It is drawn exploded for simplicity, and I haven't drawn the cotton bits in either. The motor mounts are shown in blue, these are fuse clips that hold the motors securely. The motors themselves are shown in orange. All the loops shown are made out of the same copper wire that the frame is made out of. The red circles on the frame represent the red risers you can see on the bottom of the picture. These risers rise vertically out of the page - so I couldn't draw them properly. These risers are only to get the cotton to pull the legs up properly - the cotton goes from the loop in the rear leg through this red riser, through the central loop, back down to the other red riser, and then to the front leg. The green risers are for making the robot move left and right - the 'waist' action. Here some cotton is wrapped around the waist motor, goes through the closest green riser, then gets tied off at the second green riser.
 Here are the legs. You have to put these on the frame before fully making the frame, because there's no way to put them on after the frame is finished! The cotton for the leg motor starts at the motor, and goes straight to the loops in the leg. This makes the legs go up and down. They go up and down alternately: you push the rear right leg up, and the front right leg goes down. This means that at any one time the robot is mostly supported by only 2 legs. It usually rocks down onto a third, but this leg doesn't affect the locomotion of the robot.
To attach the cotton to the motor shaft, I filed a small flat onto the shaft, and tied the cotton tightly around the shaft in the flat spot. Then I wrapped a couple of turns around the shaft and put the ends of the cotton to where they had to go.
Here is some of an e-mail I sent previously to the list explaining some more about the robot:
Here are the legs. You have to put these on the frame before fully making the frame, because there's no way to put them on after the frame is finished! The cotton for the leg motor starts at the motor, and goes straight to the loops in the leg. This makes the legs go up and down. They go up and down alternately: you push the rear right leg up, and the front right leg goes down. This means that at any one time the robot is mostly supported by only 2 legs. It usually rocks down onto a third, but this leg doesn't affect the locomotion of the robot.
To attach the cotton to the motor shaft, I filed a small flat onto the shaft, and tied the cotton tightly around the shaft in the flat spot. Then I wrapped a couple of turns around the shaft and put the ends of the cotton to where they had to go.
Here is some of an e-mail I sent previously to the list explaining some more about the robot:
The leg joints are pivots so when one leg moves up, the other leg moves
down.  The rear legs are attached with cotton to the front legs so that
when the left rear goes down, the left front goes up.  Making this happen
with a waist motor as well was a bit of a pain, but eventually I got it
working by having a central pole with a loop in it, and all the connecting
threads from the front to the back were passed through this central hole.

The leg motor drives the rear set of legs, and via the cotton, thr front
ones as well.  The waist motor is mounted on the front portion of the
robot, and pulls the whole front section around in a direction set by the
microcore.  It needed a couple of posts with loops in the ends to make it
work, and these look sort of like animal ribs.

It measures 10 cm long, by about 7 cm wide.  I used a standard 4 neuron
microcore, with 4 extra diodes so that the leg motor was always on, but
the waist motor would go on then off then reverse then off.

I used 2 74HC245's, with each motor being fed by 8 gates.  The timing
diagram looks like this:

      ----    ----
leg
          ----

        --      --
waist --  --  --
            --

The current drawn by the bot was 0.3 amps or thereabouts.  I haven't tried
putting batteries in it, I only tried using a 4 wire tether that fed the
motors.

For the frame I used some thick copper wire, bent to provide the pivots
and posts and loops and legs.
So there you go. If you have any questions then please e-mail me and I'll be happy to try to answer them.
This page
designed by Ben Hitchcock.
|